These are some lovely Meconopsis at Far Reaches Farms in Pt Townsend, WA a few years ago. I grew my first from seed last year, and this year I’m scaling up!
Emboldened by my success, I ordered several species from the UK (they’re native to the Himalayas, but because the UK seems to be a nation of gardeners, they have all the cool seeds).
Behold my first batch of babies! Meconopsis Baileyi — very high germination, now pricked out into 2″ pots.
I’m quite pleased with myself over these modified tweezers. The Baileyi babies are really tiny (they’ve already grown significantly in this photo), and would have been impossible to pick out by hand without causing damage.
With these, I could pull out little plugs.
So far I also have a few sprouts of Grandis and Lingholm and Naupalensis.
Still waiting for a couple species, but I have some things to try.
It’s fun, but it’s a long game — the earliest any of these babies could bloom is next year.
Fortunately I have my yearlings to look forward to. They are just starting to wake up from winter dormancy!
Here at the solstice, in the dark of winter, I am dreaming of my garden at the summer solstice.
Here is a snapshot of what was in bloom within a week of the summer solstice.
First up, breadseed poppies and feverfew.
Breadseed poppies bloom for a relatively short window — each flower only lasts a couple days — but they can put on an impressive show when they’re in flower!
And in the autumn you get neat seedpods that hold the poppy seeds used in baking.
I tried a few new flowers this year. All of them were somewhat successful, and I will be growing most of them next spring.
Here, California bluebells and Bird’s-eye gilia join in a beautiful but ephemeral display.
Both are wildflowers, so they have a short but spectacular bloom in late spring.
This is Schizanthus, with the rather rude common name of poor man’s orchid. It is quite beautiful, and unlike the bluebells and Gilia it continues to bloom all summer.
It also looks good both close up and from a distance, which is not always true.
The copper on the pot is to keep slugs away.
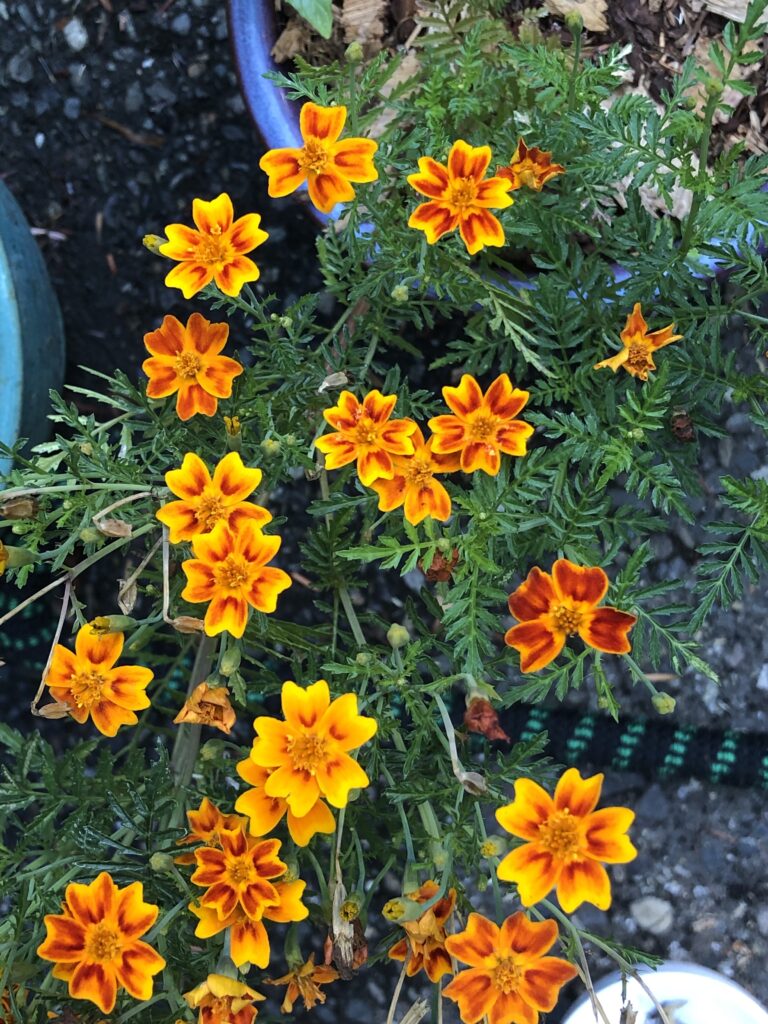
Signet marigolds are one of my favorite annuals.
I grow them in big pots, three plants to a pot. They don’t photograph especially well, but they bring lots of life and color. Close up, the reds are my favorites, but the orange and yellow form a tapestry with the other flowers.
In gardening, everyone draws the line between weeds and flowers in a different spot.
For me, mullein is definitely on the “flower” side. This one is just getting started. They become a handsome 3-5 foot spike, and the birds love the seeds!
Feverfew and foxglove behind.
Some flowers photograph beautifully.
For others, a photo just does not capture their charm.
Here, gentian sage rises in front of agastache, with signet marigolds in the background.
Sages and agastaches in general are charming — especially in person!
And Chantilly snapdragons!
I grew these from seed last spring, but unlike the others they are not true annuals. They often overwinter in our climate, and I have also discovered you can take cuttings! I have a bunch of babies in the basement.
Thank you for coming on this tour of my summer solstice garden!
I will be growing all of these again… and I may have ordered a dozen or two packets of seed to try in addition.
Happy solstice, and know the light will be longer tomorrow!
I have grown coreopsis before, starting it indoors on the theory that it was a hot weather plant that needed heat to get a good start.
I quite enjoyed the dwarf mix I got a year or two ago, but they started blooming late, and the plants were very leggy… so I decided I probably didn’t have enough sun, and wouldn’t grow them this year.
I mentioned elsewhere that I tried Schizanthus (Poor Man’s Orchid) this year, direct sown into large pots.
Mid-spring, I noticed that some of the “Schizanthus” clumps were not like the others. In fact, they looked suspiciously like coreopsis!
I had reused the soil, and apparently my extra layer of coir/perlite/vermiculite to guarantee a clean base was just thick enough to make the coreopsis happy.
The result is a lovely airy cloud of color.
This is definitely the way to do coreopsis!
I’ll be trying to deliberately reproduce this serendipity next winter.
Another of the flowers that I am trying this year are Salpiglossis. They are cousins of the petunias, and can be quite spectacular.
Although you can direct-sow them, the best option for large plants is to start them inside.
They’re a bit fussy to start inside, so I’m not sure whether I’ll grow them next year. I love the stained-glass flowers, but in the mix I used, the yellow is more common and floriferous… pretty, but I have other yellows in the garden that are a lot less fussy to grow.
I really like the jewel-tones that some of them have, though.
We’ll see how my energy level is doing next spring!
I really appreciated the growing notes provided by Growing with Plants! I recommend the article if you want to give these a try, but a few key points are that the darkness germination requirement is probably nonsense, keep them fairly cool, use a dry/moist cycle, and use petunia fertilizer.
I might have fared better if I had found these notes before I had started my seeds for the year!
In the coming weeks, I’ll wait for each new bloom to open, to see what its patterning will be.
Here in the Pacific Northwest it tends to start in late June, and then continue intermittently for a month or so.
This is the umpty-ninth descendent of a Lauren’s Purple. I think the color is still pretty true… it’s a gorgeous burgundy.
Feverfew in the background.
Here is the poppy bed. Here in the Puget Sound area, I usually sprinkle out the poppy seeds in January of February. They sprout in a few weeks, then sit and do nothing for a couple months. It gives them a stronger start, though.
The one catch is that the slugs like them. No red frillies this year, for that reason…
I usually do two beds of poppies, one of the red frillies and one of the purples. For some reason the slug pressure on the reds was very high this year, and I wasn’t on top of dealing with it. Next year I will take measures early and thoroughly!
Breadseed poppies close up at night! Usually just for one night, but still, they have the mechanism.
They can’t re-pack themselves the way they were in the bud, but they close each pair of lips as much as they can (they usually have four symmetrical petals). The inner pair basically acts like a clamshell!
Genetics are always fun!
The cut edge on this one came by way of the cut-edged reds that I usually grow.
It also only has three petals, which is a straight-up mutation.
Here they are, a side-shot all closed up for the evening. It’s a good thing, because we got a little rain!
Possibly the last for weeks, so every drop is precious.
Breadseed poppies are fun, and if you can allow the seedheads to develop, you can use them for baking! Plus, the seedheads look cool.
Every year I try some new seeds, or try to improve on what has gone before.
Here we have Schizanthus, California Bluebells, and Gilia Tricolor.
I planted all three species in large pots outside on March 1st, just as the weather started to tilt towards spring. The pots have copper tape around them, since we have a lot of slugs, and our slugs like almost all types of flower babies.
I used large (~12″) pots, and did a cluster of seeds in the center, and three clusters equally spaced around the edge. I did not thin — I think these species really didn’t need it (with the possible exception of the Schizanthus).
The Gilia Tricolor was the first to bloom, opening a few flowers in late May.
The pollinators like it!
I think it’s starting to fade — it’s basically a California wildflower, so a relatively short bloom season is to be expected, but it has been a lovely addition to the mid-spring garden.
It has a naturally cascading habit. Next year I think I’ll do a bit more in the way of supports, but it doesn’t break when it bends over.
The California bluebells opened a week or so later, at the start of June.
I had grown them before, but previously I had started them indoors and transplanted them. They did much better direct-sown into their big pot!
Their color is amazing. They really are that blue!
They are still going strong, but I don’t expect them to make it far into July. They are another wildflower that really hasn’t seen any hybridization.
They also have a cascading habit. Some short supports will help control and spread the cascade. I might try a couple more vertical supports for the central cluster next year, to see if I can make more of a mound, but they are lovely as-is.
The Schizanthus were the last of the three to open, starting just after the CA bluebells.
I should have staked the Schizanthus early and vigorously; they want to be vertical, and they snap under their own weight when it rains.
The flowers are quite pretty; the common name is “Poor Man’s Orchid.”
I think this one has been hybridized more. We’ll see what the bloom span is like.
So far, the three make good friends, since their bloom period and color range overlap nicely.
Two of the three are basically CA wildflowers, so I expect them to finish fairly soon. Hopefully the Schizanthus will continue into the summer!
I think I’ll grow all three again next year, but with a lot more staking for the Schizanthus.
This year I did one pot of each; next year I’ll multiple the California Bluebells and Gilia Tricolor. They are very pretty at a time when not much is blooming here.
It has been a busy spring: work, life, and a sick kitty conspired to stretch us thin. Things are finally settling down, in time for us to enjoy the lead-up to summer.
The swallowtails have arrived, just in time for the Dame’s Rocket. This is a lovely plant, but invasive in some areas — check before you grow!
A bunch of other things are starting to bloom or just hitting their stride.
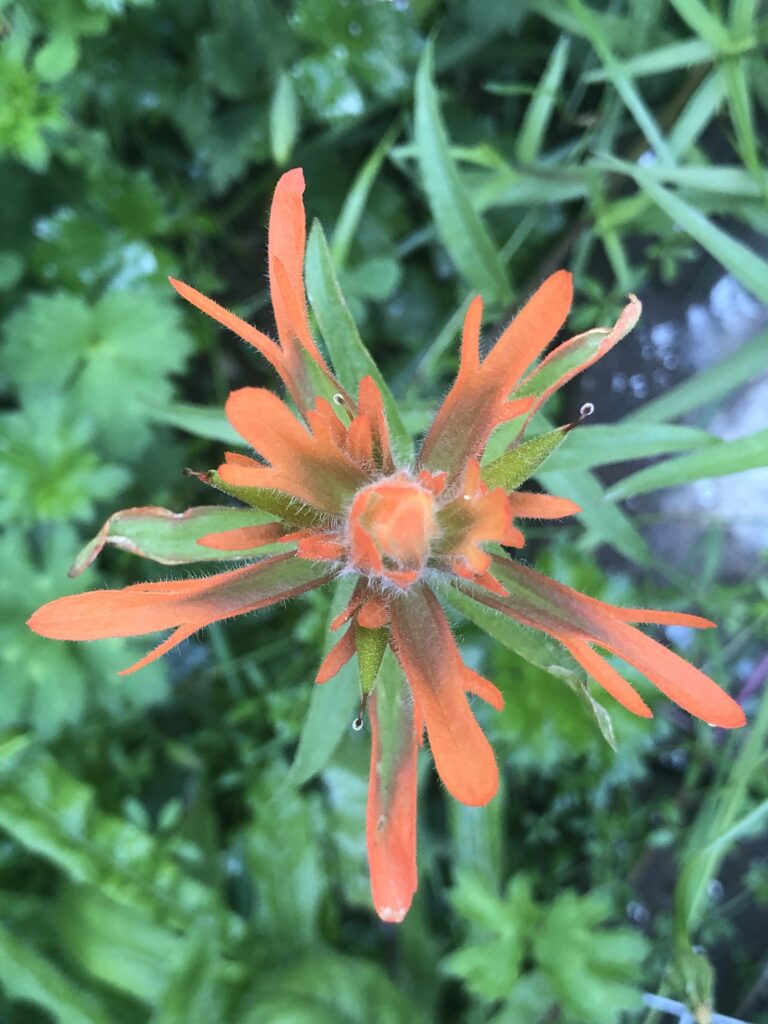
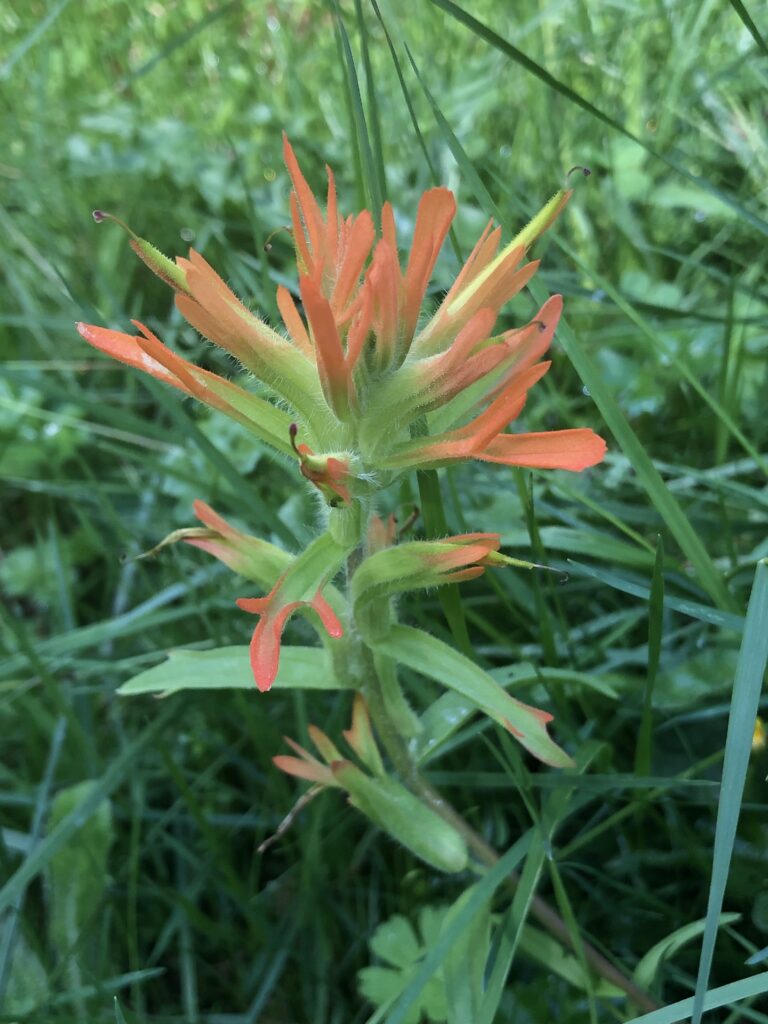
The Harsh Paintbrush has been going for a couple weeks now. I grew these from seed two years ago, and am very pleased that they are solidly perennial.
The slugs tend to munch on them when they’re starting to res-route; the copper around the pots eliminates that problem. I’ll be trying to plant some out this year — we’ll see whether I can keep them safe in the spring in the ground!
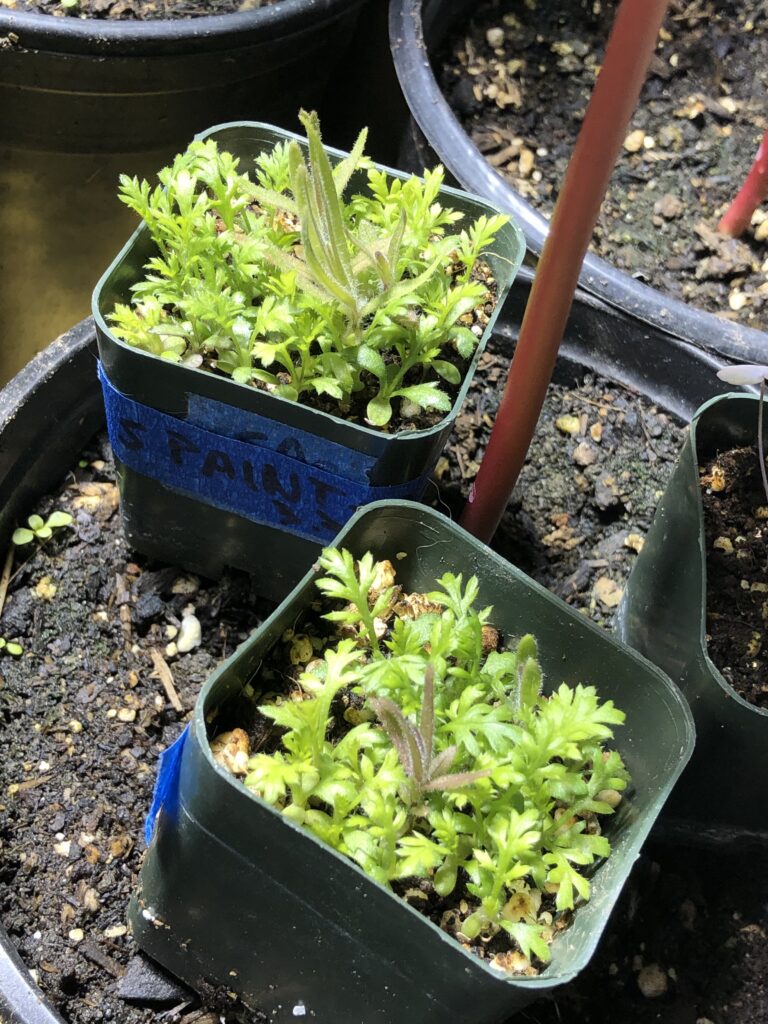
I also started some baby paintbrushes from some of the plants that bloomed last year. It’s gratifying to have their propagation down — maybe not to nursery standards, but quite solidly enough for home use.
I scarify the seeds in a ziplock back with some damp coconut coir for 6 weeks, then I sprinkle them in a 4″ pot filled with a coir/perlite/vermiculite mixture with a little vermiculite over. They sprouted in just a few days under grow lights in the basement.
About a month on, I use a fork to pull out chunks and stick them in 2″ pots. Then I sprinkle some native yarrow seeds over: these will act as the host plant, since paintbrushes are semi-parasitic. Yarrow sprout fast enough that they catch up nicely, and then they can grow up together.
Unfortunately not everything was so successful.
The native penstemon were getting off to an amazing start after the same scarification and planting regiment as the paintbrushes… but they had a mold attack very early on, and it pretty much destroyed them. I might get one.
Lesson here: plant them more thinly, and maybe don’t use vermiculite over them; I feel like the vermiculite made it worse.
The planting notes for this species do mention that they are susceptible to damping off… so I will be much more careful next time!
One other note on damping off:
I was a good girl and bleached all my pots this year, and it made a big difference (penstemon aside). The only things I had any problems with were my first batch of chocolate cosmos (note to self, they do *not* like being wet — keep them on the dry side until they hit their stride), and the penstemon.
So, lots of success and a few failures this spring.
More notes later! I will resist putting everything in this one catch-up post 😉
The spring has flown! Work deadlines have kept me tied up through the glories of mid-spring. Most of those glories have been wonderful, but familiar.
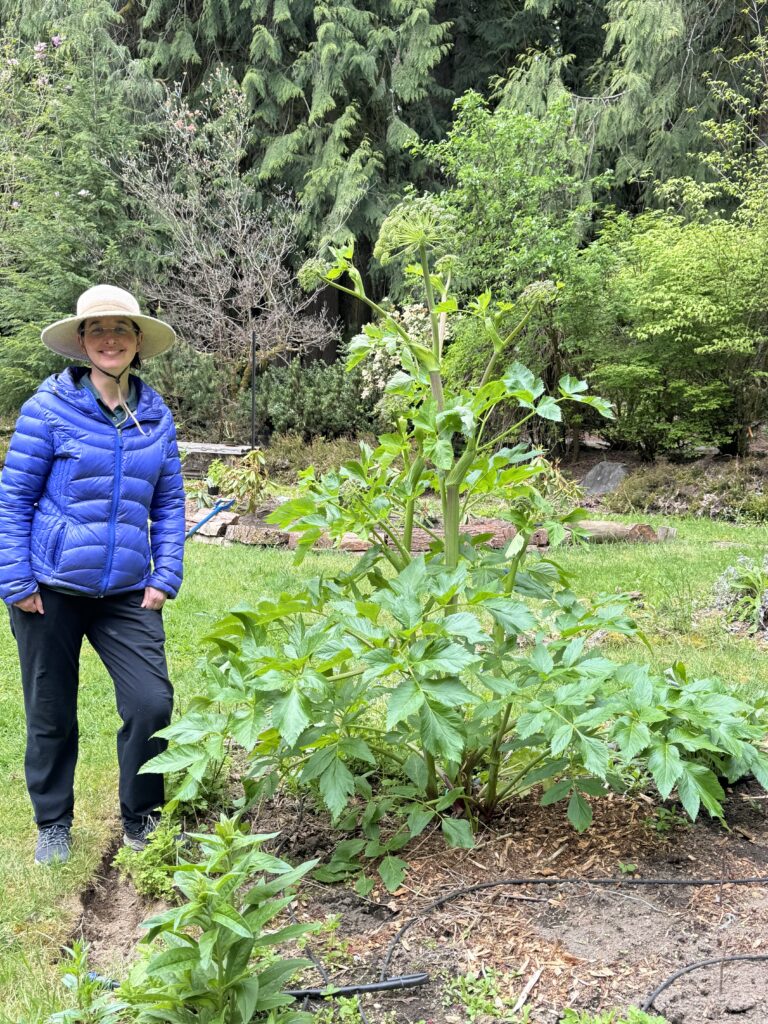
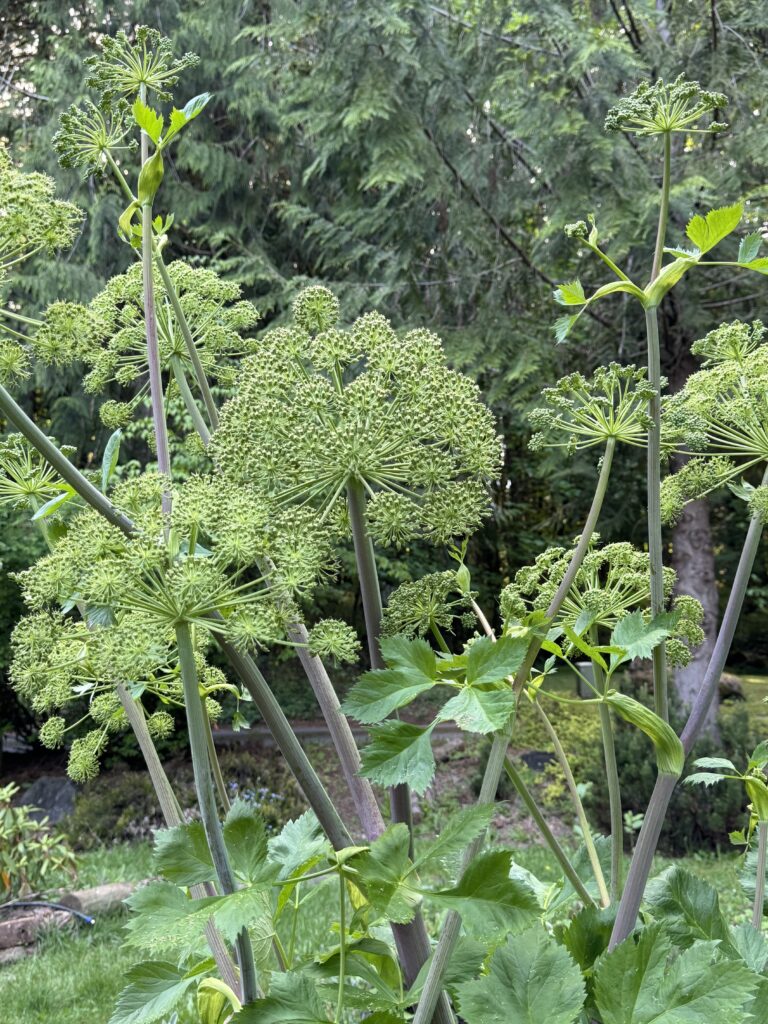
A major exception has been the Angelica!
I purchased it as a young plant two years ago, and expected it to bloom last year (it is categorized as a biennial). It turns out to be a “soft” biennial, that might wait an extra year.
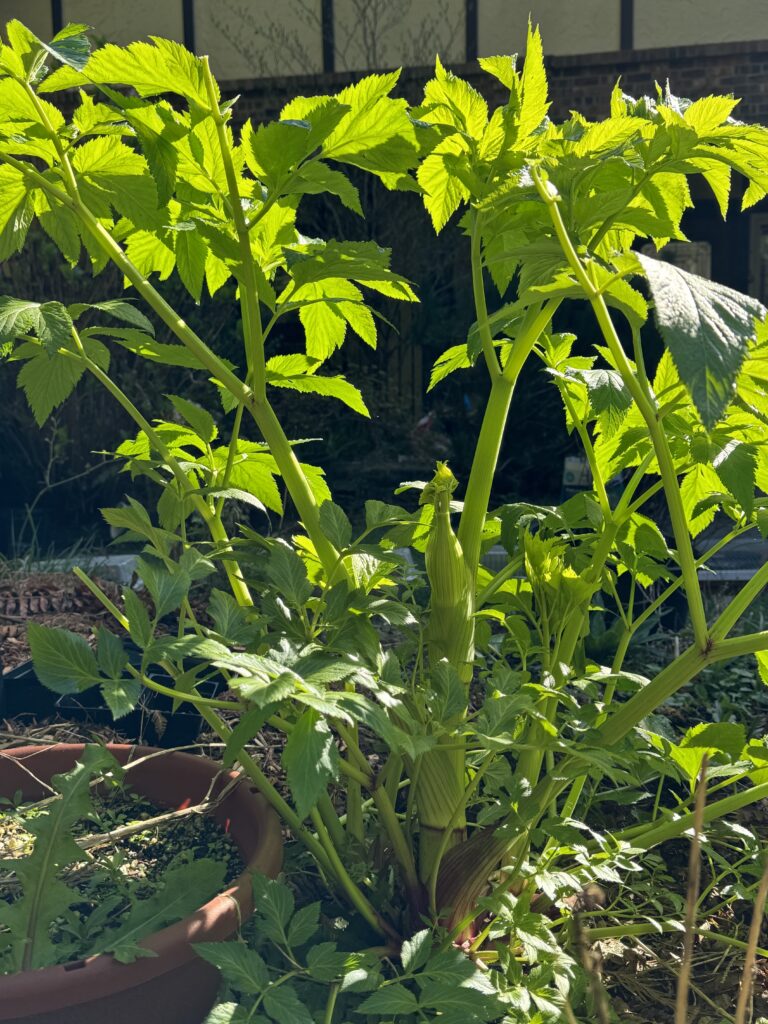
I was very excited when the stalk first started going up in late March.
Over the next month, it got taller and taller, until it finally developed the umbel that I was expecting.
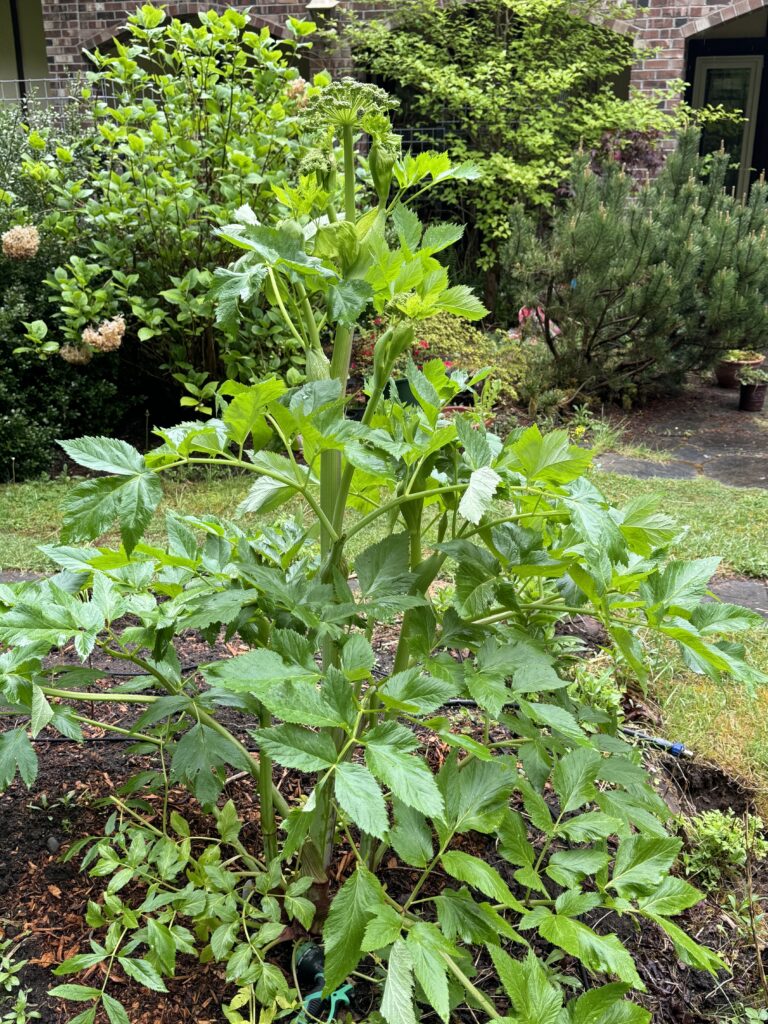
I expected it to open into a white-flowered umbel… rather like a giant Queen Anne’s Lace.
Nope!
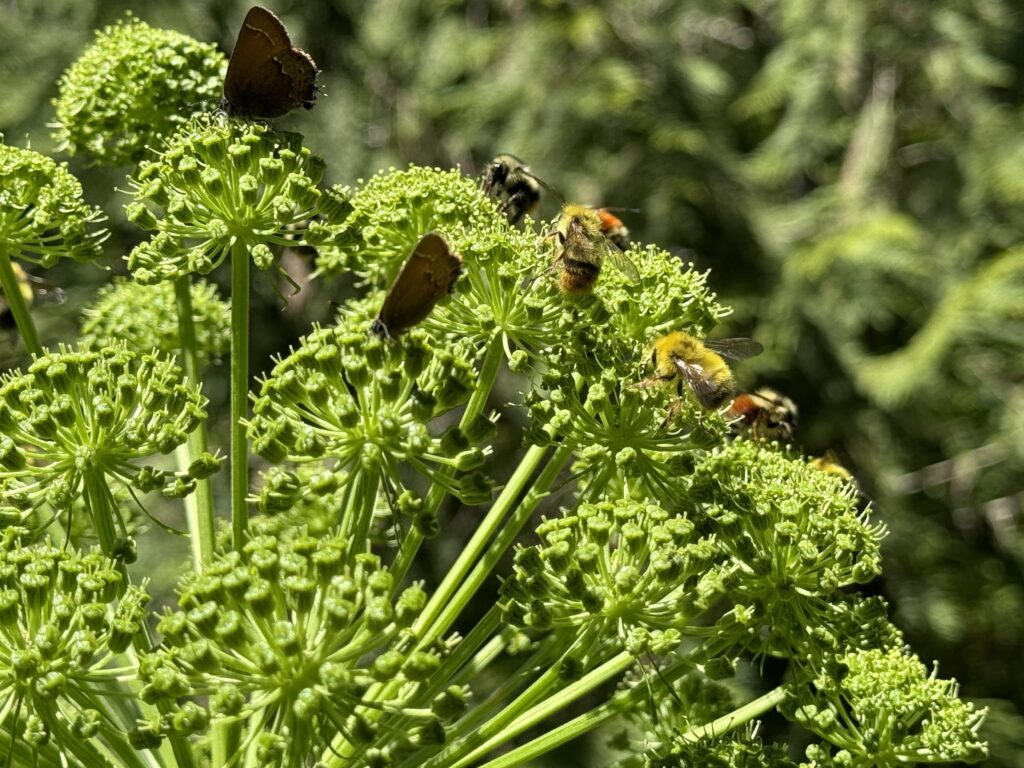
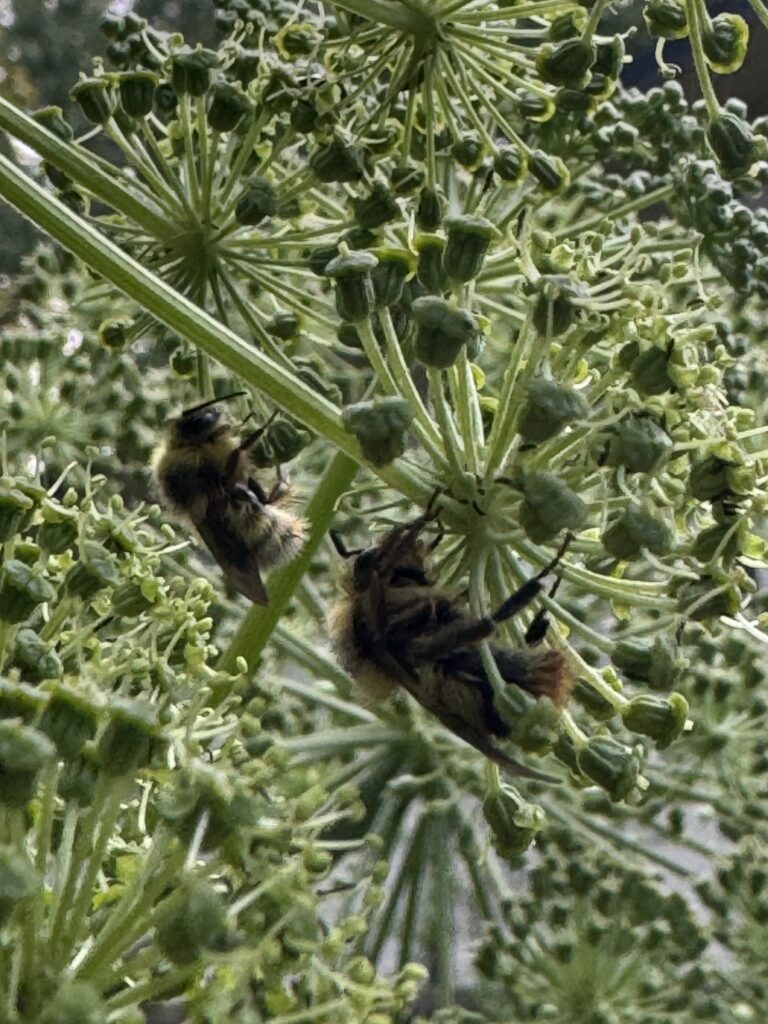
It took another two weeks to open, but I could really only tell because it was covered in foraging pollinators… the flowers stayed green, a little like giant, spherical parsley flowerheads.
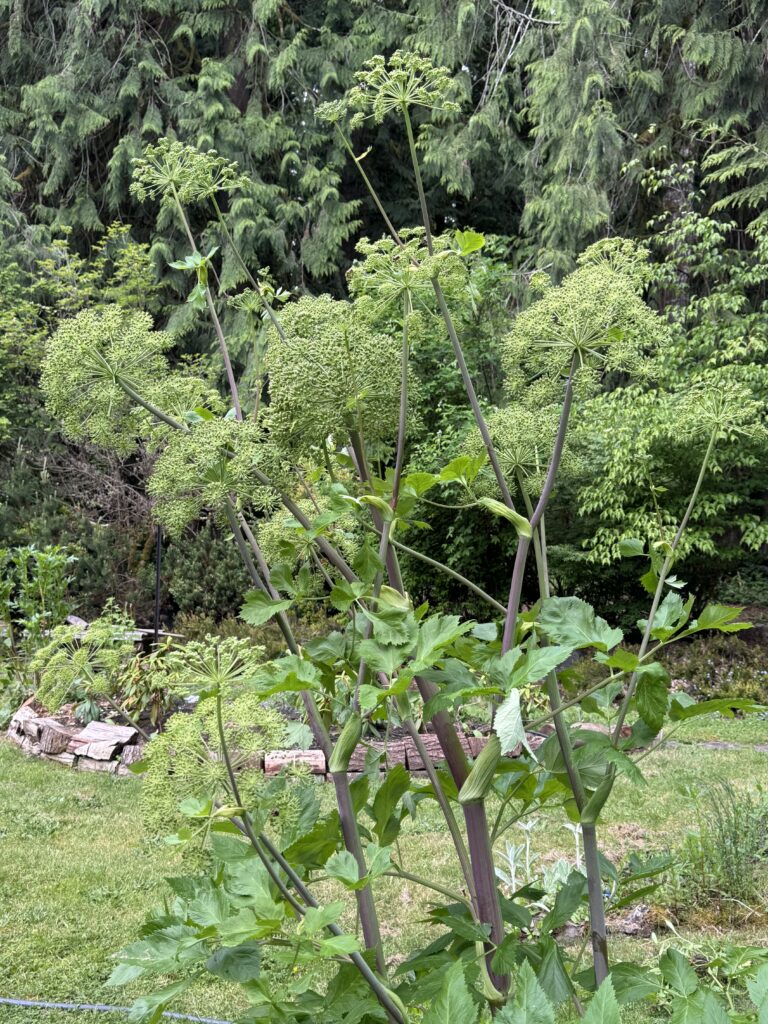
The resulting show has been both less pretty, and far more amazing, than I expected.
I expected one big flower. There are dozens!
The earliest flower is now developing seeds, but I can tell which heads are in bloom at any time based on the cloud of bumblebees.
Yesterday morning, I went out early, and was surprised to spot a bunch of bumblebees clinging to the bottom edge of the flowers. Napping!
I’m surprised such an open flower makes a good bivouac, but they’re the experts 🙂
All parts of the Angelica are good to eat; it tastes like a potent combination of celery and fennel. I’m guessing the seeds should be good for cooking, and I’ll be sure to plant some for future years.
The Angelica also has one offset on the main plant, so I’m hoping that it might survive the flowering. Otherwise it will be three years before I have this fun again!
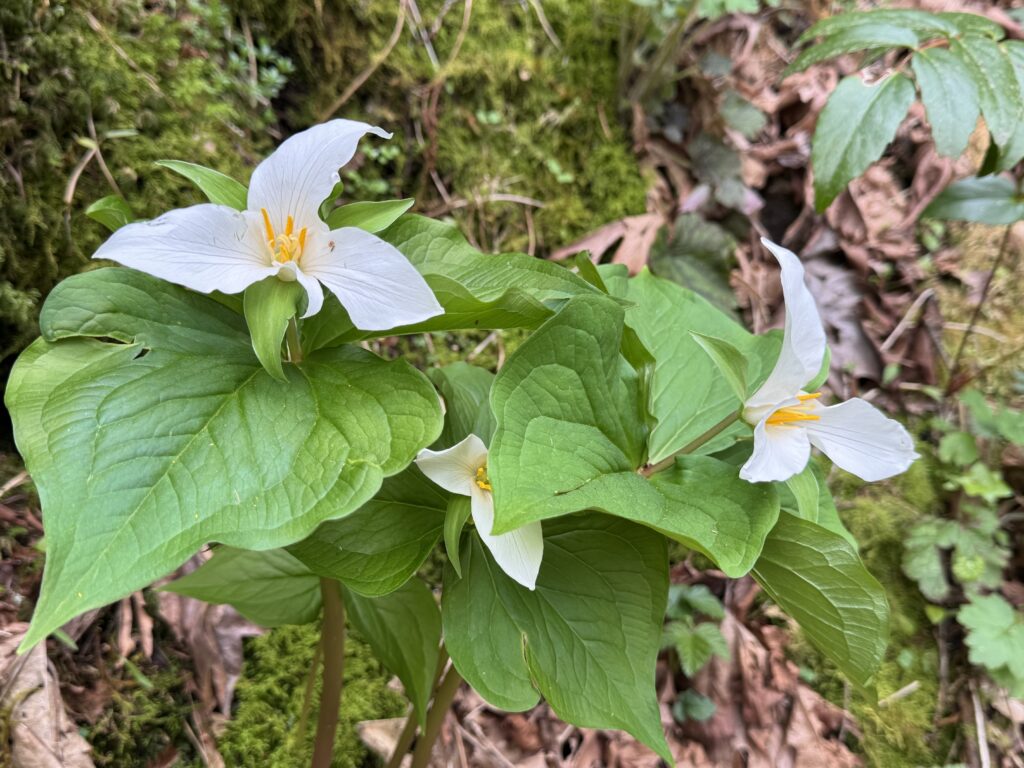
Pacific Trillium. These native beauties were photographed at Cougar Mountain park in Renton 3/30
Based on my photo rolls, everything is running 1-3 weeks earlier than usual.
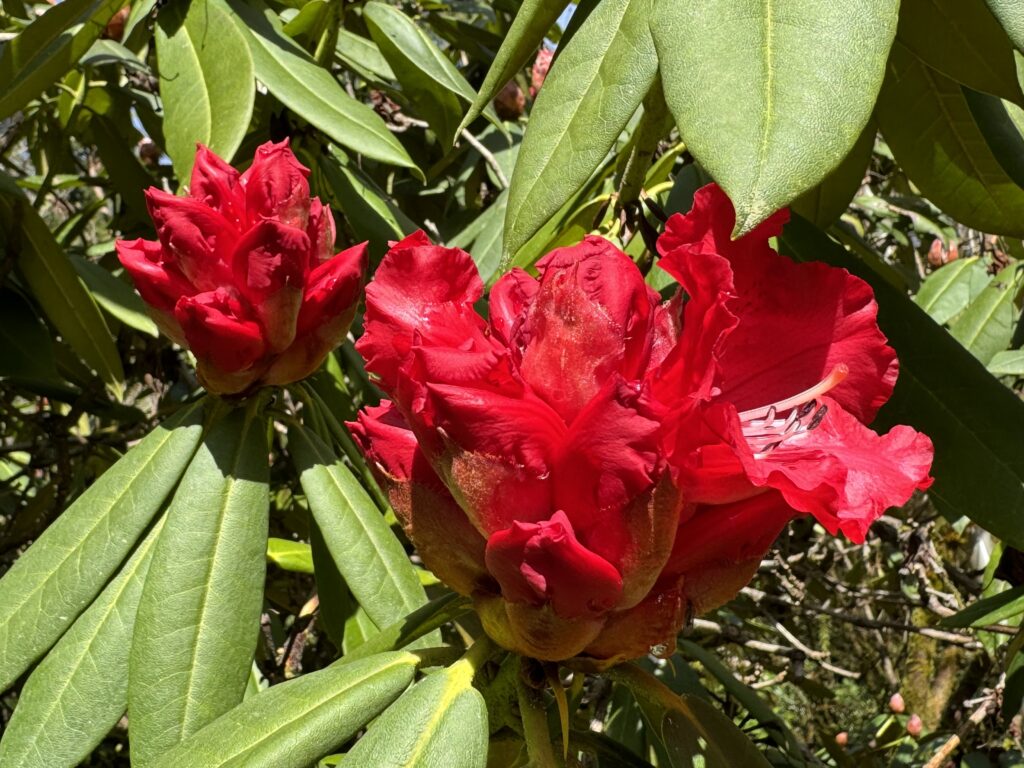
Earliest red rhodie at our home. Taken 3/30.
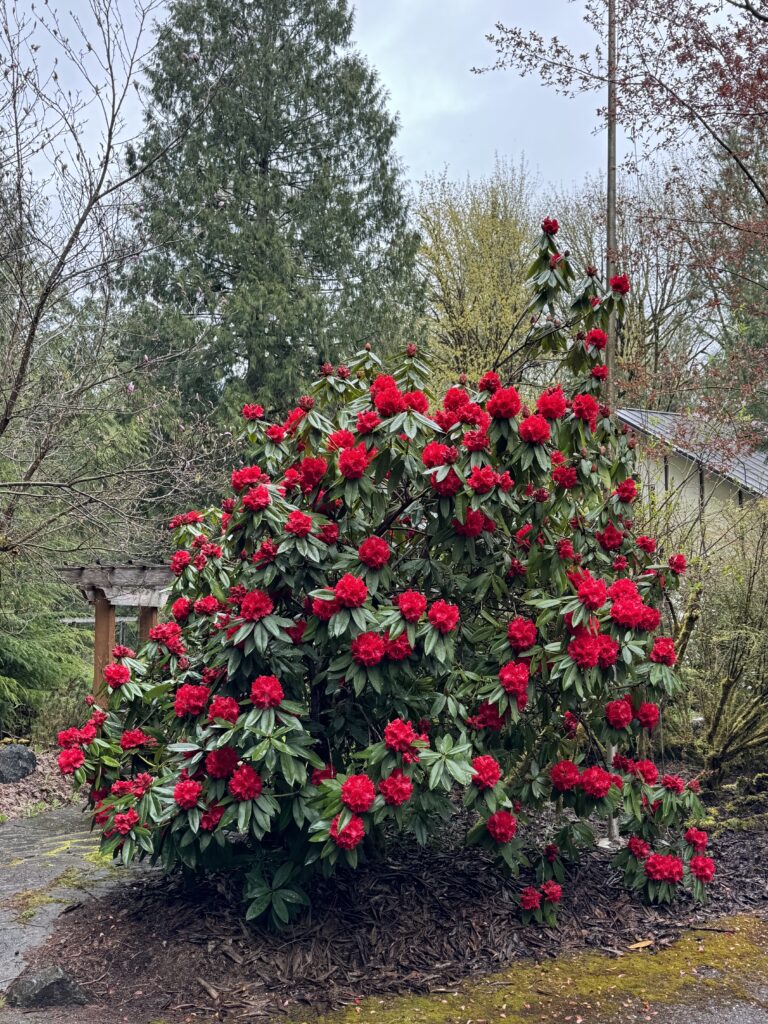
Our early big red started opening a week ago, and is now in full bloom.
Big red, 4/6/24
Last year, it was at a comparable bloom point 4/22.
I admit I’m enjoying the warmer weather, even as I worry about this summer.
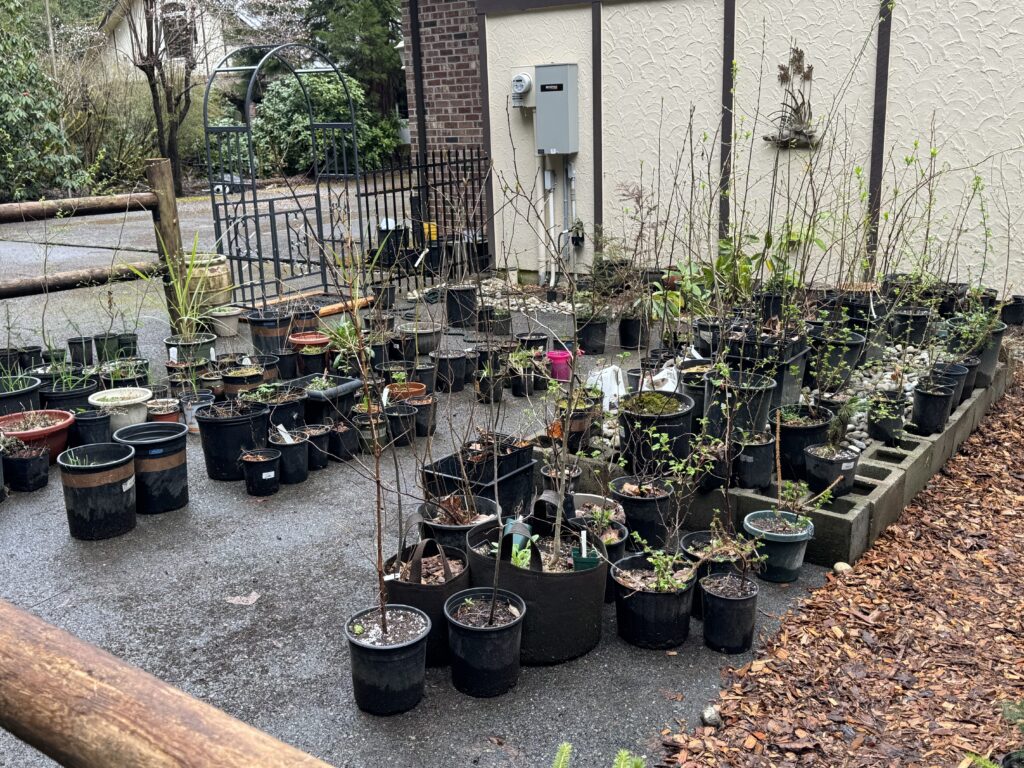
Rob helped me set up a new nursery area in some excess driveway space. I’ve been busily up-potting a lot of the native trees and shrubs that we’re growing on.
A lot of them will go in the ground this fall.
I have a lot of native seeds in the “wait and see” stage. They require both stratification and patience!
Fortunately, I also have garden friendlies like signet marigolds to give me instant gratification in the meantime 🙂
I grew them for the first time last year, and thought them utterly adorable, so I’m doubling down this year!
I’m growing seeds from this beauty, some compact orange signet marigolds, and some burgundy signet marigolds. I have no idea how true they’ll come from seed, but only one way to find out!
My basic protocol was to fill a sterilized 4″ pot with a soil-free mixture of 2 parts coir, 1 part perlite, 1 part vermiculite. I then planted the seeds and put the pots outside under a hardware cloth cover to get scarification over the winter.
Based on the UW native plant protocols (available to the public here: https://jbakker.shinyapps.io/Protocols/ ), I planted the seeds on the surface and sprinkled a light layer of perlite on top.
Note that you should be able to do scarification in the refrigerator; I’ll be experimenting more with that in the 2023-24 season. For my first attempt, I wanted to keep everything as “natural” as possible.
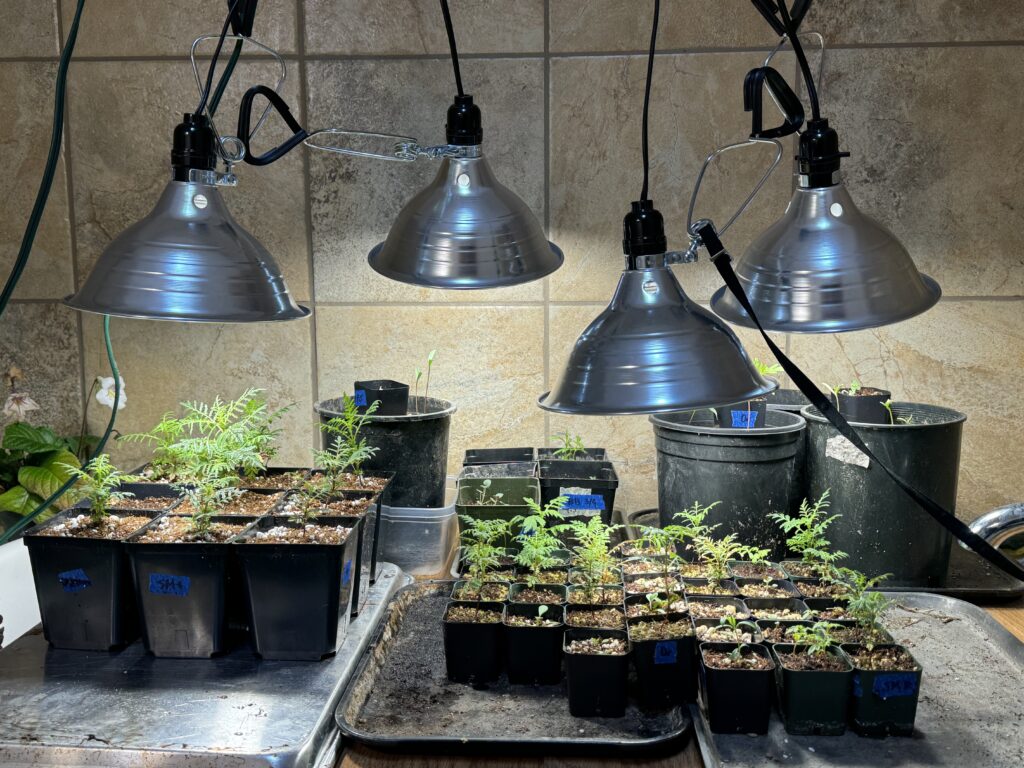
When I checked my native seed pots in mid February, I had some sprouts starting! At around this time, I brought the pots in and put them under grow lights in the garage (about 50F).
By 3/7 they had 2-4 true leaves, and I split them into multiple 2 and 4″ pots (scooping out small clumps of seedlings with a fork and transferring them as intact as possible), and added native yarrow seeds.
Most paintbrush species are hemiparasitic: they can do their own photosynthesis, but they get a boost from their neighbors. I had encountered a reference indicating that they could be grown with native yarrow, which is convenient because yarrow is an extremely fast sprouter.
The yarrow sprouted in less than a week, and they really started to take off.
2″ pots of Paintbrush seedlings surrounded by host yarrow, 1 month after yarrow seeds were added.
I up-potted into 4″ and gallon pots over the next two months. I moved them back outside sometime in April, probably late April.
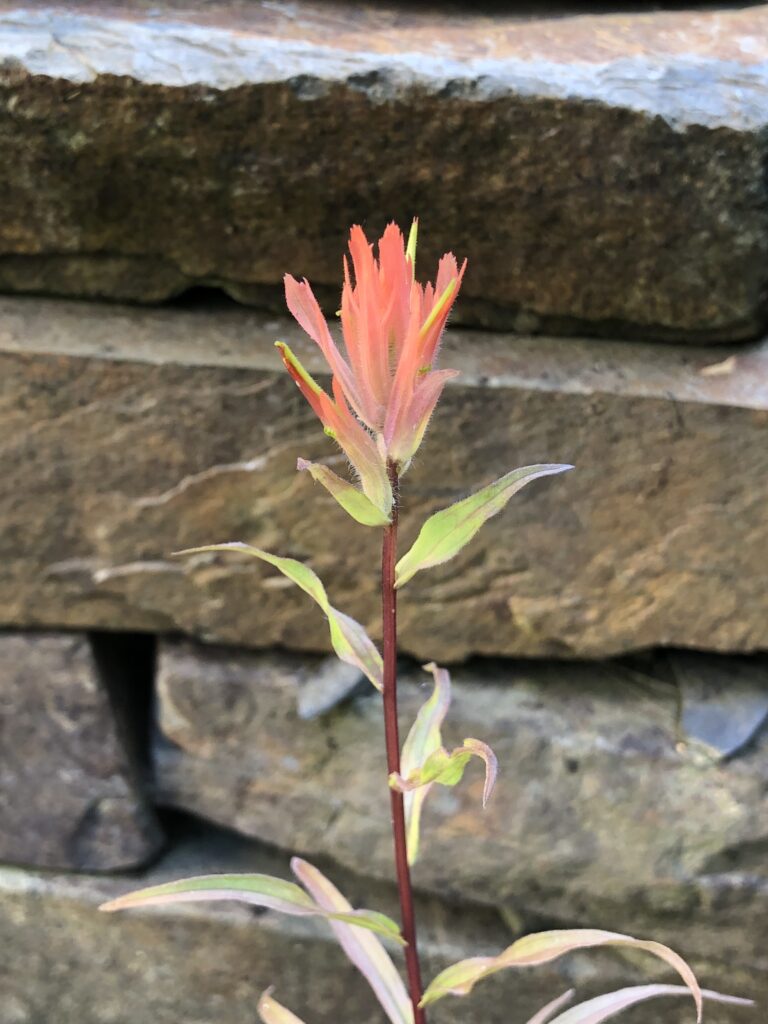
I got my first bloom at the beginning of June!
This was a lovely surprise, because I had thought that I would have to wait until the next year to get any blooms.
As it turned out, most of the Paintbrush plants wound up blooming, probably because of the boost they got from their time under grow lights through early spring.
Another unexpected and pleasant surprise was how long the flowers lasted. That initial flower was still going strong 3 weeks later. I think it lasted a good month.
The other paintbrush plants started blooming in late July.
Some paintbrush plants are biennial, some are perennial. I think these are perennial, so I will plant them out in a meadow area this autumn, and hope they come back next year.
One more planting note: these are listed as full sun, but we really don’t have full sun available; the best I could do was 6 hours of direct sun, with shade the rest of the day.
That probably wasn’t optimal, but it was enough to get blooming plants!
Let me know if you have questions! If you decide to give them a try, good luck!